In this guide, we’ll walk you through the process of setting up OpenWRT on Proxmox VE (Virtual Environment), an enterprise-grade server virtualization platform. This setup will allow you to utilize OpenWRT as a virtual machine (VM), leveraging Proxmox VE’s robust management features to handle networking and routing functionalities.
Step 1: Download the OpenWRT Image
- Navigate to the OpenWRT Release Page: Go to the official OpenWRT release page and select the latest stable release. release OpenWRT
- Choose the Correct Image: Under the targets, navigate to
x86then64. It’s crucial to select the image namedgeneric-ext4-combined.img.gz. Avoid choosing the “efi” file. - Copy the Image Link: Right-click on the file and copy the link address. in this case my link is this https://downloads.openwrt.org/releases/23.05.3/targets/x86/64/openwrt-23.05.3-x86-64-generic-ext4-combined.img.gz
Step 2: Prepare the Image on Proxmox Host
- Download and Unpack the Image:
cd /var/lib/vz/template/iso/ wget https://downloads.openwrt.org/releases/23.05.3/targets/x86/64/openwrt-23.05.3-x86-64-generic-ext4-combined.img.gz [paste-the-copied-link-here] gunzip openwrt-*.img.gz - Resize the Image:
To fit the intended disk size for your VM, resize the image using the following command (example for an 8 GiB disk size):
For a more specific example, use:qemu-img resize -f raw openwrt-*.img 8Gqemu-img resize -f raw /var/lib/vz/template/iso/openwrt-23.05.3-x86-64-generic-ext4-combined.img 8G
Step 3: Convert and Prepare the Disk
- Convert the Image Format (Optional):
If needed, convert the image to a different format, such as QCOW2:qemu-img convert -f raw -O qcow2 /var/lib/vz/template/iso/openwrt-23.05.3-x86-64-generic-ext4-combined.img /var/lib/vz/images/108/vm-108-disk-1.qcow2
Step 4: Create and Configure the VM
- Create a New VM in Proxmox:
Ensure no installation media, drives, or startup is configured initially. Use SeaBIOS. - Import the Disk: ( not needed for me to do this in ProxMox V8 )
Use the following command to import your disk into the VM:qm importdisk [VMID] openwrt-*.img [STORAGEID] - Configure the VM Disk:
Go to the VM settings, select “Hardware”, then the “Unused Disk 0”. Set it to VirtIO with both “Discard” and “IO Thread” options enabled.
Step 5: Final VM Setup
- Attach Networking and Additional Devices:
Customize your VM by adding necessary network interfaces or other devices as required for your use case. - Finalize the VM Configuration:
Execute the following command to set the SATA controller for the VM disk:qm set 100 --sata1 /var/lib/vz/images/100/vm-100-disk-1.qcow2
Step 6: Launch and Enjoy
- Once all configurations are in place, start your VM and enjoy the robust functionality of OpenWRT within your Proxmox VE setup.
This setup allows you to fully utilize OpenWRT’s capabilities in a virtualized environment, providing a flexible and powerful platform for advanced routing, network management, and security features.
Make sure you edit the network:
vim /etc/config/network
After you added the IP you need reboot the server.
I used this Project to install CoovaChilli
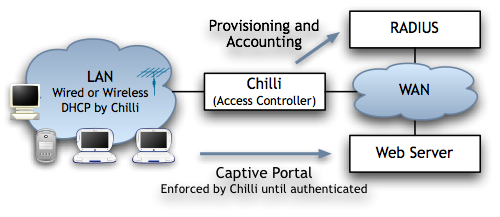 CoovaChilli is an open-source software access controller, based on the popular, but now defunct, ChilliSpot project, and is actively maintained by an original ChilliSpot contributor.
Released under the GNU General Public License (GPL).
CoovaChilli is a feature rich software access controller that provides a captive portal / walled-garden environment and uses RADIUS or a HTTP protocol for access provisioning and accounting. CoovaChilli is an integral part of the CoovaAP OpenWRT-based firmware which is specialized for hotspots. For more information on how Coova’s Chilli differs from the standard ChilliSpot, be sure to see the ChangeLog.
Fallow the documentation for more CoovaChilli, an open source captive portal access controller
Also I have tested openNDS on OpenWrt
- Have a router working with OpenWrt. At the time of writing, the current version of openNDS has been tested with OpenWrt 22.03.x, 23.05.x and Master Snapshot.
- openNDS v10.0.0 or higher, will not work on versions of OpenWrt less than 22.03.x
- Make sure your router is working correctly before you try to install openNDS. In particular, make sure your DHCP daemon is serving addresses on the interface that openNDS will manage.The default interface is br-lan but can be changed to any LAN interface by editing the /etc/config/opennds file.
- To install openNDS on 23.3.x or higher, you may use the OpenWrt Luci web interface or alternatively, ssh to your router and run the command:
opkg update
followed by
opkg install opennds
- openNDS is enabled by default and will start automatically on reboot or can be started and stopped manually.
- If the interface that you want openNDS to manage is not br-lan, edit /etc/config/opennds and set the gatewayinterface option.
- To start openNDS, run the following, or just reboot the router:
service opennds start
- To test the installation, connect a client device to the interface on your router that is managed by openNDS (for example, connect to the router’s wireless lan).
Most client device operating systems and browsers support Captive Portal Detection (CPD) and the operating system or browser on that device will attempt to contact a pre defined port 80 web page.
CPD will trigger openNDS to serve the default splash page where you can click or tap Continue to access the Internet.
See the Authentication section for details of setting up a proper authentication process.
If your client device does not display the splash page it most likely does not support CPD.
You should then manually trigger openNDS by trying to access a port 80 web site (for example, http://gnome.org is a good choice).
- To stop openNDS:
service opennds stop
- To uninstall openNDS:
opkg remove opennds